
1. Introduction
Overview of Linux and its history:
Linux and Unix are pivotal in computing history. Unix emerged in the 1960s, pioneering multitasking and multiuser systems. Linus Torvalds introduced Linux in 1991, offering an open-source alternative to expensive Unix. Linux’s collaborative nature encouraged widespread access and customization, leading to diverse “distributions.”
Both systems share hierarchical file structures and security emphasis. However, Unix is proprietary, while Linux’s open-source approach enables customization.
Unix’s influence extends to macOS and more, while Linux evolved from a personal project to a global force, highlighting open collaboration’s power. These systems, shaped by different eras, epitomize technological evolution and democratization, leaving a profound impact on modern computing.
The different Linux distributions and their uses

Here are some of the most common Linux distributions and their uses:
Ubuntu:
- One of the most popular Linux distributions, known for its ease of use and user-friendly interface.
- Used for general-purpose computing, web browsing, and multimedia applications.
Fedora:
- A community-driven Linux distribution that focuses on open-source software and cutting-edge technologies.
- Used for software development, system administration, and desktop computing.
CentOS:
- A free, enterprise-class Linux distribution that is popular for web hosting, server administration, and cloud computing.
- Known for its stability and security features.
Debian:
- One of the oldest and most popular Linux distributions, known for its stability and reliability
- Used for server administration, software development, and desktop computing.
Arch Linux:
- A lightweight and highly customizable Linux distribution that is designed for advanced users and enthusiasts.
- Used for software development, system administration, and gaming.
Kali Linux:
- A Linux distribution that is specifically designed for penetration testing and ethical hacking.
- Comes pre-installed with numerous security tools and utilities.
Raspbian:
- A Linux distribution that is designed for use on the Raspberry Pi single-board computer.
- Used for home automation, robotics, and educational projects.
openSUSE:
- A community-driven Linux distribution that offers both stability and cutting-edge features.
- Used for desktop computing, software development, and server administration.
Red Hat Enterprise Linux (RHEL):
- A commercial Linux distribution that is designed for enterprise-level computing and server administration.
- Known for its security features, reliability, and support.
Linux Mint:
- A popular Linux distribution that is known for its user-friendly interface and ease of use
- Used for desktop computing and multimedia applications.
Gentoo:
- A highly customizable Linux distribution that is designed for advanced users and enthusiasts.
- Known for its flexibility and optimization features.
Mageia:
- A community-driven Linux distribution that offers a balance of stability and innovation.
- Used for desktop computing, server administration, and multimedia applications.
2. Command-line interface
Introduction to the command-line interface and its advantages over graphical interfaces.
The command-line interface (CLI) is a text-based interface that allows users to interact with a computer’s operating system by entering commands and parameters. While graphical user interfaces (GUIs) are more commonly used in modern computing, the CLI has several advantages over GUIs in certain situations.
Here are some advantages of using the command-line interface:
- Efficiency: Using the CLI can be faster and more efficient than using a GUI, particularly for tasks that require multiple steps or complex commands. With the CLI, users can quickly enter commands and parameters without needing to navigate through menus or use a mouse.
- Automation: The CLI can be easily automated using scripts and batch files, which can save time and improve productivity. By automating repetitive tasks, users can free up time for more important work.
- Flexibility: The CLI can be used to perform a wide range of tasks, from simple file management to complex system administration. With the ability to pipe commands together and use regular expressions, the CLI offers a high degree of flexibility and customization.
- Remote access: The CLI can be accessed remotely using protocols such as SSH, which allows users to connect to a computer and perform tasks from anywhere with an internet connection.
- Resource efficiency: The CLI uses fewer system resources than a GUI, which can be beneficial for systems with limited resources or for tasks that require high performance.
In summary, while the CLI may have a steeper learning curve than a GUI, it offers several advantages for certain tasks and situations. By mastering the command-line interface, users can improve their productivity, efficiency, and flexibility when working with a computer’s operating system.
Understanding command-line interface syntax and options
Let’s say you want to compress a file using the “gzip” compression algorithm. The command to do this from the command-line interface in Linux would be:
gzip filename.txt In this command, “gzip” is the name of the program, and “filename.txt” is the name of the file you want to compress. This is an example of a simple command-line interface syntax where the command takes only one argument.
Now, let’s say you want to add some options to the “gzip” command. For example, you may want to specify the compression level or overwrite the original file. To do this, you would add options to the command. Here’s an example:
gzip -9 -f filename.txt In this command, “-9” is an option that specifies the compression level (in this case, the highest possible compression level), and “-f” is an option that forces the overwrite of the original file. By including these options, you can customize the behavior of the command and achieve the desired result.
In summary, command-line interface syntax refers to the structure of a command and its arguments, while options are additional parameters that can modify the behavior of the command. Understanding how to use syntax and options effectively is key to mastering the command-line interface.
Basic command-line interface commands

- ls – Lists the files and directories in the current directory.
Example: ls - cd – Changes the current working directory to the specified directory.
Example: cd /home/user/documents - pwd – Prints the current working directory.
Example: pwd - cat – Concatenates and displays the contents of one or more files.
Example: cat file1.txt file2.txt - chmod – Changes the permissions of a file or directory.
Example: chmod 755 file.txt - mkdir – Creates a new directory with the specified name.
Example: mkdir new_directory - rmdir – Deletes an empty directory.
Example: rmdir empty_directory - mv – Moves or renames a file or directory.
Example: mv file.txt new_file.txt
- cp – Copies a file or directory.
Example: cp file.txt new_file.txt
- echo – Prints a message or string to the terminal.
Example: echo “Hello, world!”
- grep – Searches for a specified string or pattern in a file or set of files.
Example: grep “example” file.txt
- ps – Displays the currently running processes.
Example: ps aux
- top – Displays the processes currently using the most system resources.
Example: top
- ifconfig – Displays network interface configuration information.
Example: ifconfig
- ping – Tests network connectivity to a specified host.
Example: ping google.com
- ssh – Connects to a remote computer using the Secure Shell protocol.
Example: ssh user@remote_host
- tar – Archives files into a tarball for backup or transfer.
Example: tar -cvf archive.tar file1.txt file2.txt
- unzip – Extracts files from a compressed archive.
Example: unzip archive.zip
- man – Displays the manual pages for a specified command.
Example: man ls
- id – Displays the current user’s UID and GID, as well as any supplementary groups.
Example: id
- whoami – Displays the current user’s username.
Example: whoami
- sudo – Executes a command with root privileges.
Example: sudo apt-get update
- su – Switches to the root user.
Example: su
- su username – Switches to the specified user.
Example: su john
- passwd – Changes the password for the current user.
Example: passwd
- netstat – Displays active network connections, routing tables, and network interface statistics.
Example: netstat -an
- chown – Changes the ownership of a file or directory.
Example: chown john file.txt
- chgrp – Changes the group ownership of a file or directory.
Example: chgrp staff file.txt
- find – Searches for files and directories that match a specified criteria.
Example: find /home/user -name file.txt
- sed – Stream editor for filtering and transforming text.
Example: sed ‘s/foo/bar/g’ file.txt
- awk – Pattern scanning and processing language.
Example: awk ‘/example/{print $1}’ file.txt
- zip – Compresses files into a ZIP archive.
Example: zip archive.zip file1.txt file2.txt
- scp – Securely copies files between hosts over the network.
Example: scp file.txt user@remote_host:/path/to/destination
- rsync – Efficiently copies files between hosts over the network.
Example: rsync -avz /local/path user@remote_host:/path/to/destination
- curl – Downloads data from a URL.
Example: curl https://google.com
- netstat – Displays active network connections, routing tables, and network interface statistics.
Example: netstat -an
- ifconfig – Displays network interface configuration information.
Example: ifconfig
- chown – Changes the ownership of a file or directory.
Example: chown john file.txt
- chgrp – Changes the group ownership of a file or directory.
Example: chgrp staff file.txt
- find – Searches for files and directories that match a specified criteria.
Example: find /home/user -name file.txt
- grep – Searches for a specified string or pattern in a file or set of files.
Example: grep “example” file.txt
- sed – Stream editor for filtering and transforming text.
Example: sed ‘s/foo/bar/g’ file.txt
- awk – Pattern scanning and processing language.
Example: awk ‘/example/{print $1}’ file.txt
- tar – Archives files into a tarball for backup or transfer.
Example: tar -cvf archive.tar file1.txt file2.txt
- zip – Compresses files into a ZIP archive.
Example: zip archive.zip file1.txt file2.txt
- ssh – Connects to a remote computer using the Secure Shell protocol.
Example: ssh user@remote_host
- scp – Securely copies files between hosts over the network.
Example: scp file.txt user@remote_host:/path/to/destination
- rsync – Efficiently copies files between hosts over the network.
Example: rsync -avz /local/path user@remote_host:/path/to/destination
- curl – Downloads data from a URL.
Example: curl https://example.com
- wget – Downloads files from the web.
Example: wget https://example.com/file.txt
- nc – Netcat, a versatile networking utility for reading and writing data across network connections.
Example: nc -lvp 4444
- nmap – Network exploration and security auditing tool.
Example: nmap -sV -O target.com
- tcpdump – Captures network packets and displays them on the terminal.
Example: tcpdump -i eth0
- ping – Tests network connectivity to a specified host.
Example: ping google.com
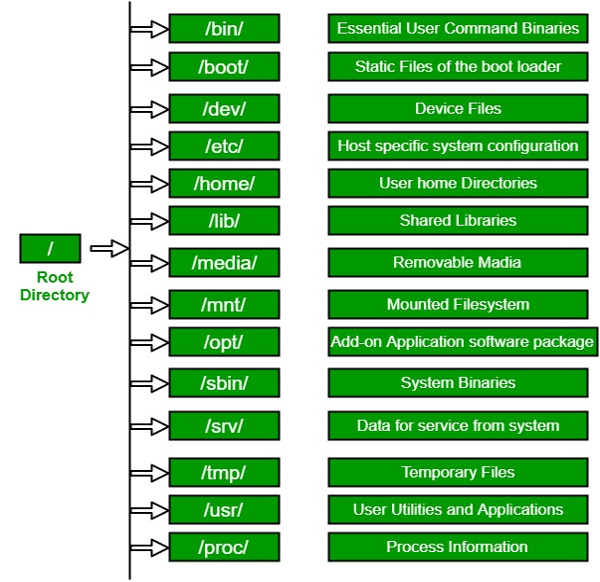
3. Linux file system
Overview of the Linux file system hierarchy and the different directories and files that are important for system administration (e.g., /etc, /bin, /usr, /home)
- / : The root directory of the file system hierarchy. Everything is organized under this directory.
- /bin : Contains essential user binaries (commands) like ls, cp, mv, etc. These commands are available to all users, and they are required for system maintenance.
- /sbin : Contains essential system binaries, such as shutdown, init, and ifconfig, that are used by system administrators.
- /usr : Contains user applications and supporting files. This directory is divided into subdirectories like /usr/bin, /usr/sbin, /usr/share, /usr/lib, etc.
- /etc : Contains system-wide configuration files, including network settings, startup scripts, and user account information.
- /var : Contains variable files such as log files, mail spool files, and system cache.
- /home : Contains the home directories for all users.
- /lib : Contains shared libraries required by the system and user applications.
- /dev : Contains device files that represent hardware devices, such as hard drives, USB ports, etc.
- /tmp : Contains temporary files that are created by system processes and applications.
4. Linux files and directories permissions
Understanding the permissions system in Linux and how to assign permissions to files and directories.
In Linux, the permissions system is used to control access to files and directories. There are three types of permissions: read (r), write (w), and execute (x). Each file or directory can have permissions set for three groups of users: the owner of the file, the group the file belongs to, and everyone else.
To view the permissions of a file or directory, you can use the ls -l command. Here is an example output:
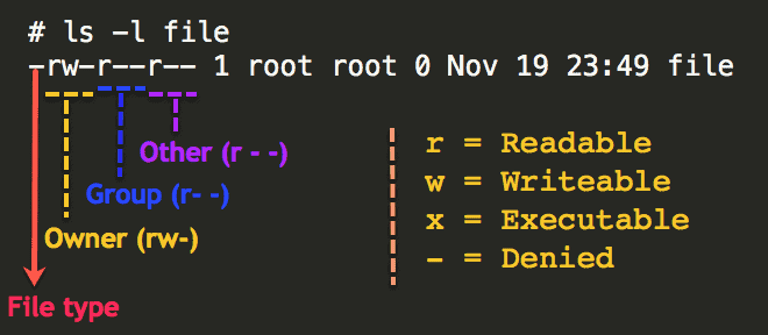
-rw-r–r– 1 user group 0 May 112:00 example.txt
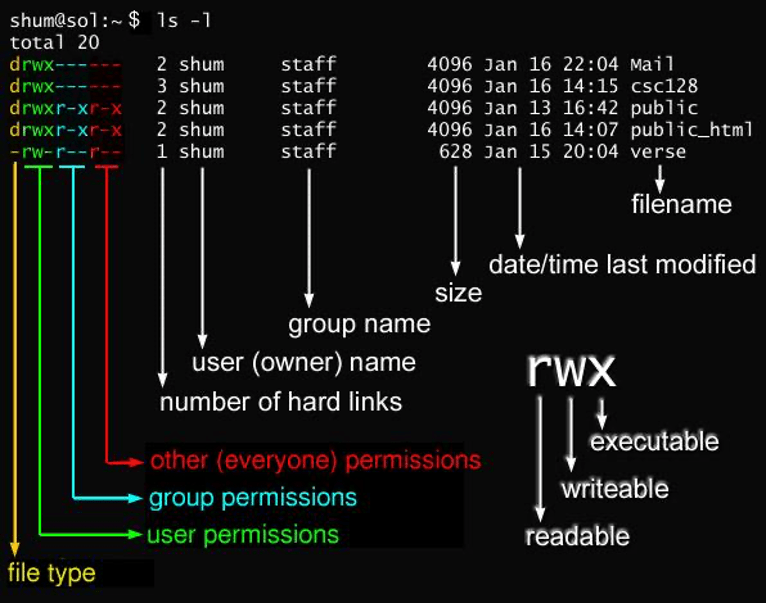
The first character in the output indicates the type of file: a dash (-) for a regular file, d for a directory, and l for a symbolic link.
the next nine characters indicate the permissions for the owner, group, and others. The first three characters (rw-) indicate that the owner has read and write permissions, but not execute. The next three characters (r–) indicate that the group has read permission only, and the final three characters (r–) indicate that everyone else has read permission only.
To change the permissions of a file or directory, you can use the chmod command followed by the desired permissions and the name of the file or directory. For example, to give the owner of a file read, write, and execute permissions, and remove all permissions for everyone else, you can use the following command:
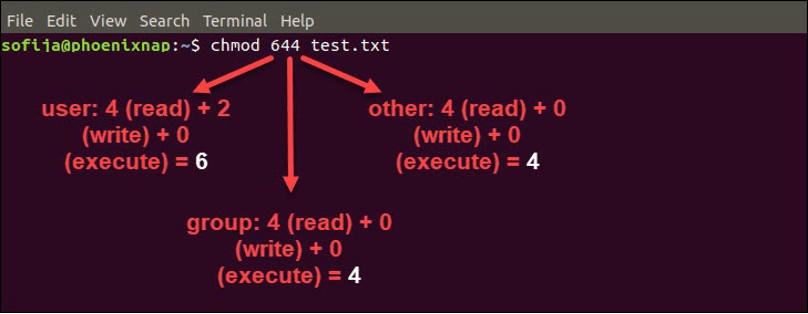
chmod 644 example.txt Here, the first digit (6) specifies the permissions for the owner (read, write, and execute), the second digit (4) specifies the permissions for the group (none), and the third digit (4) specifies the permissions for everyone else (none).
You can also use letters instead of digits to set permissions. For example, to give the owner read and write permissions, and everyone else no permissions, you can use the following command:
chmod u+rw example.txt chmod o-rwx example.txt Here, u+rw means “add read and write permissions for the owner,” and o-rwx means “remove all permissions for others.”
It’s important to note that you need to have the appropriate permissions yourself in order to change the permissions of a file or directory. If you don’t have the necessary permissions, you can use the sudo command to run the chmodcommand as the superuser.
Basic file manipulation commands (e.g., touch, cp, mv, rm)
- touch: The touch command is used to create a new file or update the timestamp of an existing file. For example, to create a new file called file.txt, you can use the following command:
touch file.txt - cp: The cp command is used to copy files and directories. For example, to make a copy of a file called file.txt in the same directory with a new name file_copy.txt, you can use the following command:
cp file.txt file_copy.txt - mv: The mv command is used to move or rename files and directories. For example, to rename a file called file.txt to new_file.txt, you can use the following command:
mv file.txt new_file.txt - rm: The rm command is used to remove files and directories. Be careful when using this command, as it can permanently delete files. For example, to remove a file called file.txt, you can use the following command:
rm file.txt These are just a few basic file manipulation commands. There are many more advanced commands available in Linux, but mastering these basics will allow you to perform most common file operations.
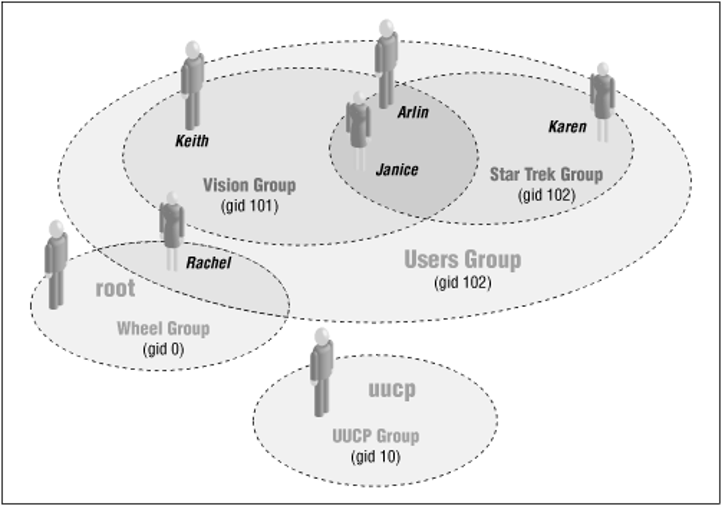
5. User accounts and groups
- Understanding how user accounts and groups work in Linux.
- How to create and manage user accounts
- Assigning permissions to users and groups
In Linux, a user account is used to identify and authenticate a user on the system, while a group is used to organize users with similar access permissions. Here’s an overview of how user accounts and groups work in Linux:
User Accounts:
- Every user account in Linux has a unique username and UID (User ID).
- User accounts are defined in the /etc/passwd file.
- Each user account has a home directory, which is the default location where files and folders are stored for that user.
- User accounts are assigned to one or more groups.
Groups:
- Groups are used to organize users with similar access permissions.
- Each group has a unique name and GID (Group ID).
- Group information is stored in the /etc/group file.
- Users can be a member of one or more groups, and group membership defines the access permissions of the user.
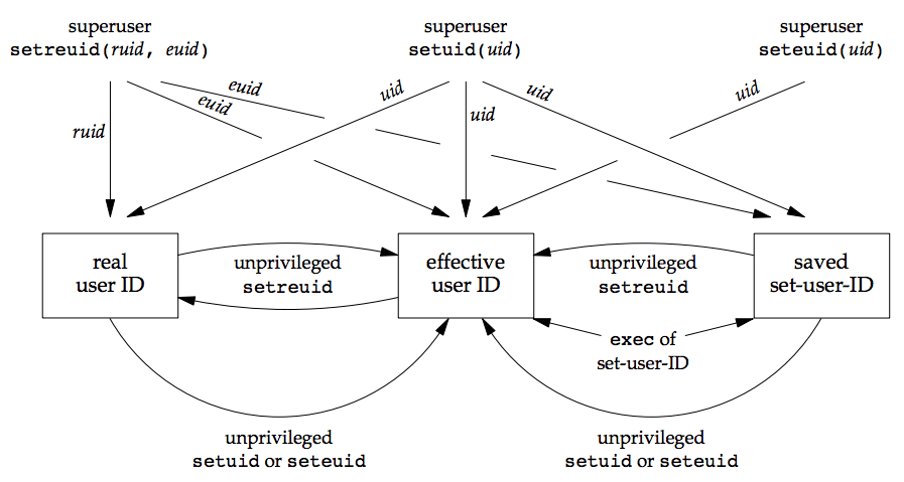
Real, Effective, & Saved UID/GID
Here are some examples of user account and group management commands:
- Creating a new user account:
sudo useradd john This command creates a new user account named “john” on the system. By default, the user’s home directory will be created in /home/john.
- Setting a user account password:
sudo passwd johnThis command sets a password for the “john” user account.
- Creating a new group:
sudo groupadd developersThis command creates a new group named “developers” on the system.
- Adding a user to a group:
sudo usermod -aG developers johnThis command adds the “john” user to the “developers” group. The -aG option adds the user to the group without removing them from any other groups.
- Changing file ownership and permissions:
sudo chown john:developers /var/www/html/index.html

sudo chmod 664 /var/www/html/index.html
These commands change the ownership of the index.html file to the “john” user and the “developers” group, and set the file permissions to allow read and write access for the owner and group, and read access for all other users.
6. Basic networking concepts
Understanding basic networking concepts such as IP addresses, ports, and protocols
- IP addresses: An IP (Internet Protocol) address is a unique numerical identifier assigned to each device that’s connected to a network. It enables devices to communicate with each other by routing data packets to the correct destination. IP addresses come in two forms: IPv4 and IPv6. IPv4 addresses are 32-bit and represented in dot-decimal notation (e.g. 192.168.1.1), while IPv6 addresses are 128-bit and represented in hexadecimal notation.
- Ports: Ports are a mechanism used to identify specific processes or applications running on a networked device. A port is a number between 0 and 65535, and there are three ranges of ports: well-known ports (0-1023), registered ports (1024-49151), and dynamic or private ports (49152-65535). For example, HTTP (Hypertext Transfer Protocol) typically uses port 80, while HTTPS (HTTP Secure) typically uses port 443.
- Protocols: Protocols are sets of rules and standards that govern how devices communicate over a network. Examples of networking protocols include TCP/IP (Transmission Control Protocol/Internet Protocol), HTTP, FTP (File Transfer Protocol), SMTP (Simple Mail Transfer Protocol), and SSH (Secure Shell). These protocols provide guidelines for how data is transmitted between devices, including how data packets are formatted, how errors are handled, and how data is encrypted or decrypted.
Examples: Here are some examples of how these concepts might come into play in a networked environment:
- IP addresses: Say you have a home network with a few devices connected to it, including a desktop computer, a laptop, and a smartphone. Each of these devices would have a unique IP address assigned to it by the router that connects them to the internet. For example, your desktop might have the IP address 192.168.1.100, while your laptop might have 192.168.1.101, and your smartphone might have 192.168.1.102.
- Ports: Let’s say you want to run a web server on your desktop computer so you can host a website. By default, web servers use port 80 to receive incoming HTTP requests. So, you would need to configure your web server software to listen on port 80 so that it can respond to incoming requests.
- Protocols: When you visit a website in your web browser, your browser communicates with the web server using the HTTP protocol. The browser sends an HTTP request to the server, which then responds with an HTTP response containing the webpage you requested. This communication happens over a network and is facilitated by the underlying TCP/IP protocol.

Configuring network settings in Linux.
In Linux, you can configure network settings using a variety of tools and methods, depending on your distribution and network setup. Here are a few examples:
Using the command-line interface: You can configure network settings such as IP address, netmask, and default gateway using the command-line interface. The most common tool for this is ifconfig, but it has been deprecated and replaced by ip command.
For example, to set a static IP address of 192.168.1.10 with netmask 255.255.255.0 and default gateway 192.168.1.1, you can use the following commands:
sudo ip addr add 192.168.1.10/24 dev eth0

sudo ip route add default via 192.168.1.1
These commands configure the interface eth0 with the IP address and netmask, and set the default gateway.
Using NetworkManager: NetworkManager is a daemon that runs in the background and manages network connections. It is the default network management tool in many Linux distributions such as Fedora, Red Hat, and Ubuntu.
To configure network settings using NetworkManager, you can use the nmcli command-line tool. For example, to set a static IP address of 192.168.1.10 with netmask 255.255.255.0 and default gateway 192.168.1.1, you can use the following commands:
sudo nmcli connection modify eth0 ipv4.addresses 192.168.1.10/24

sudo nmcli connection modify eth0 ipv4.gateway 192.168.1.1
These commands modify the network connection for eth0 to use the specified IP address, netmask, and default gateway.
- Editing configuration files: You can also configure network settings by editing configuration files directly. For example, in Ubuntu and Debian, you can edit the file /etc/network/interfaces to set a static IP address:
auto eth0 iface eth0 inet static address 192.168.1.10 netmask 255.255.255.0 gateway 192.168.1.1These are just a few examples of how to configure network settings in Linux. The exact commands and methods will depend on your distribution and network setup.
Basic networking commands (e.g., ping, nslookup, ifconfig)
Here are some basic networking commands in Linux with examples:
ping: This command is used to check the connectivity between two devices. It sends an ICMP echo request to the specified host and waits for an ICMP echo reply.
Example: ping google.com- nslookup: This command is used to query DNS servers to get the IP address that corresponds to a domain name.
Example: nslookup google.com- ifconfig: This command is used to configure and display network interface parameters.
Example: ifconfigThese are just a few examples of the many networking commands available in Linux. Other useful commands include netstat, traceroute, ssh, scp, and ftp.
7. Package management
Understanding package management tools such as apt or yum for installing and managing software on a Linux system.
Package management tools are used to manage software packages on a Linux system, including installation, updating, and removal. Two commonly used package management tools are apt and yum.
APT: Advanced Package Tool (APT) is the default package manager for Debian-based Linux distributions such as Ubuntu. APT uses a repository of software packages, which can be local or remote, to manage the installation, updating, and removal of software. Here are some examples of using APT:
To update the package repository: sudo apt update

To install a package: sudo apt install <package-name>

To update a package: sudo apt upgrade <package-name>

To remove a package: sudo apt remove <package-name>YUM: Yellowdog Updater, Modified (YUM) is the default package manager for Red Hat-based Linux distributions such as CentOS. YUM also uses a repository of software packages to manage software. Here are some examples of using YUM:
To update the package repository: sudo yum update

To install a package: sudo yum install <package-name>

To update a package: sudo yum update <package-name>

To remove a package: sudo yum remove <package-name>
Both APT and YUM have a wide range of options and features that allow for greater control over package management on a Linux system.
Installing and updating software packages using package management tools
sudo apt update  # Update the local package index.

sudo apt install firefox  # Install Firefox web browser.

sudo apt install apache2  # Install the Apache web server.

sudo apt update  # Update the local package index.

sudo apt upgrade  # Upgrade all installed packages to their latest versions.

sudo yum update  # Update the local package index.

sudo yum install firefox  # Install Firefox web browser.

sudo yum install httpd  # Install the Apache web server.

sudo yum update  # Update all installed packages to their latest versions.
sudo yum update # Update all installed packages to their latest versions
8. Basic system administration tasks
- Understanding basic system administration tasks such as configuring network settings, managing users and groups, and installing and updating software.
- Understanding system logs and how to monitor them for troubleshooting purposes.
- Basic system administration commands (e.g., service, top, ps)
9. Conclusion
- Recap of key concepts and takeaways from the course
- Final thoughts and recommendations for further learning and practice in Linux basics.
By covering these topics, students will have a strong foundation in Linux and the command-line interface, which will be essential for any further studies in Linux system administration or security.

Leave a comment