Pre-Migration Preparation
- We collect exiting configuration file from juniper firewall.
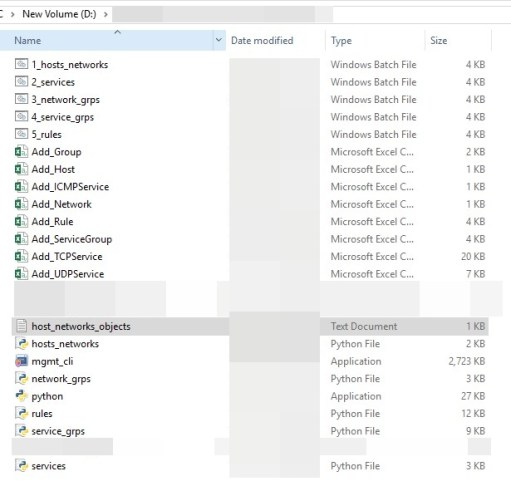
- Now we must separate hosts, Network Groups, Services objects, services group and policies from configuration files. as shown below screenshots.
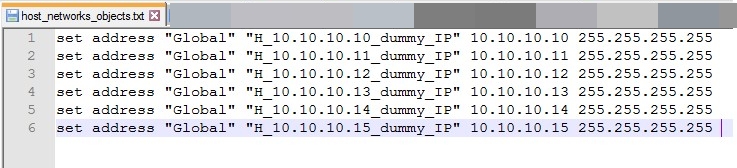

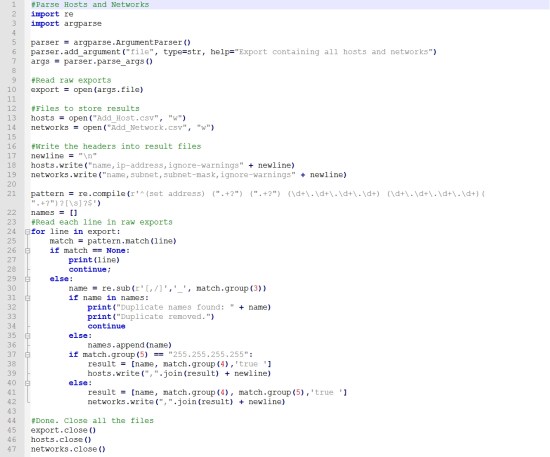
- Our goal is we need to convert our text file to CSV file using a custom python automation script. This is a very crucial part of the migration. (Because there is no standard tool to convert from checkpoint vendors). Here I show one of a python script.

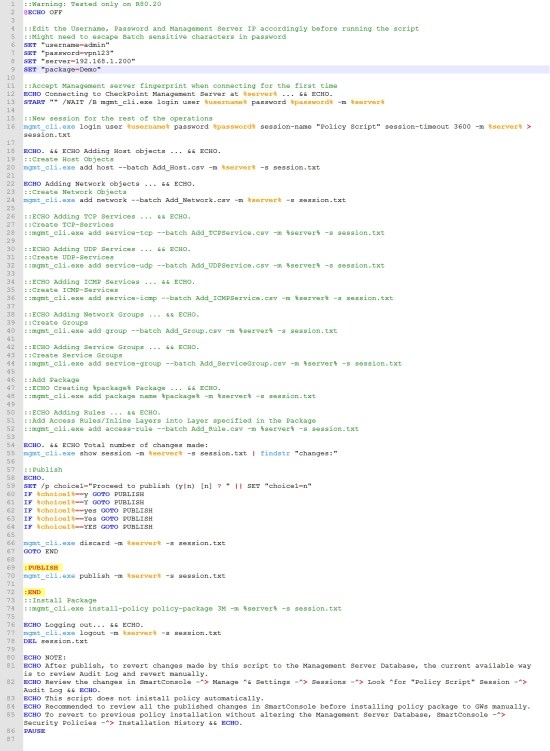
- Once we convert to CSV files, We need to push those CSV data into the checkpoint. For this process, we take advantage of checkpoint API’s by using mgmt._cli.exe and window custom batch scripts. Here I show one of the batch scripts.

- Once we push all CSV data into checkpoint management server, check Network hosts, Network group, Network Range, services, Service groups, disabled policies, enabled policies are installed correctly or not.
- Once pushed policies into checkpoint management server (smart console), verify policies. If there any duplicate removes according to the environment. However, Checkpoint doesn’t allow duplicate policies because we can’t able to install policies into new firewalls.
- If you find any issue/error while performing in these above steps, I will discuss later some of the common troubleshot techniques.
Basic configuration for New checkpoint firewall
- We have to collect DHCP Relay, Static routes, DHCP Servers list, Network Interfaces, trunk port(VLAN) from existing Juniper firewall. It may vary in every environment.
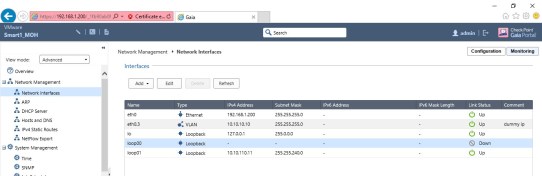
- Set up management interface as per for existing Network.

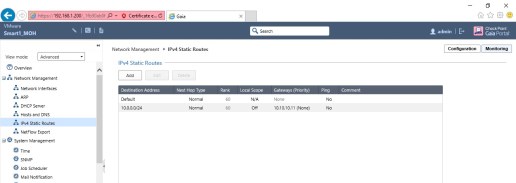
- Static Routes.
- If DHCP Relay existing in the existing Network, we must create below rules.
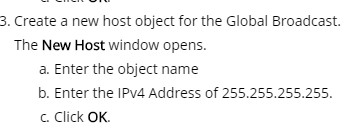
- Create a Global Broadcast host object
- Create below policy in into every new firewall.
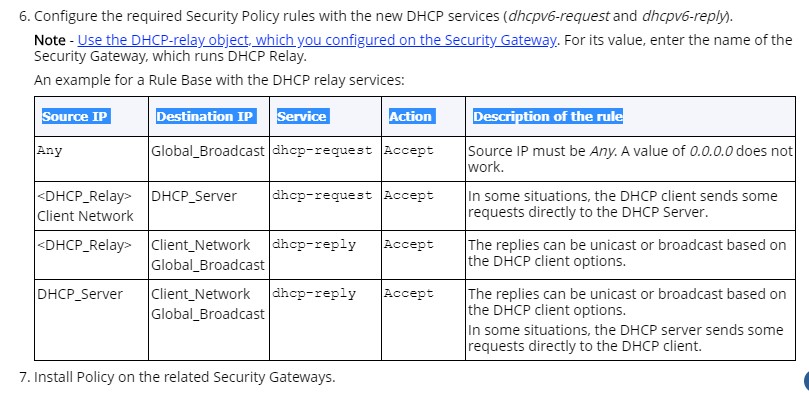
- Create a Global Broadcast host object
- If you need a cluster to follow this: Setup Sync firewall.
- Take two appropriate ethernet cables.
- Connect the Firewall-1 “Sync” port to Firewall-2 “Sync” port.
- Connect Firewall-1 any available port(eth1-8) to Firewall-2 port (eth1-8).
- Set up static routes, DCHP policies. Set up an appropriate setting for an existing network and review the setting.
- We run command “fw unloadlocal” on new checkpoint firewall, It will remove all policies from the Security Gateway (Cluster Member).
- Once the basic setup finished, We will need to take backup and Snapshot of every individual new checkpoint firewalls.
On the Migration day.
- Before start Migration Note down basic command for Troubleshooting:
Tcpdump: tcpdump -i eth1 port 49
- Once swapping of wired connections from the old firewall to the new firewall is completed, we have check network connectivity test from the checkpoint management server to deployed new firewalls(checkpoint).
- Once the connectivity test passed for both new firewalls servers, change Firewall Objects into DHCP Rules. Then We are good to create a cluster.
- Please follow the below steps for creation of the cluster. Ref: “https://checkpointengineer.com/checkpoint-r80-20-cluster-configuration/”
- Once set up Cluster done, We must monitor traffic for a few minutes and verify block traffic if there interrupt legitimate traffic.
- Execute Multicast command: “cphaconf set_ccp multicast” in new checkpoint firewalls.

- Now attach License. Please follow below reference link.
- Ref: https://sc1.checkpoint.com/documents/R80/CP_R80_Gaia_IUG/html_frameset.htm?topic=documents/R80/CP_R80_Gaia_IUG/128324
- Login to Gaia web portal(https://firewall_ip/) and verify “License and activation “status. If not activated in Gaia Follow Below Steps:
- Login to FW1 via SSH
- run cpconfig
- choose 1 (Licenses and contracts)
- Next, choose 2 (Manage contracts) and Next choose 3 (Fetch contracts Information from management server)
- Verify again the License if now activated in Gaia
- ** This is important step **: Go to Smart Console – Manage policies and layers è Edit the Site you are trying to migrate and change it to the Cluster name. EX: All Platform to – change to cluster name which created before.
- Once the Policy Target is changed, click Install Policy
- Perform user acceptance test (UAT)
- If everything okay. Firewall Migration Completed.
Please feel free to post a comment if you have any questions.

Leave a comment